概要 单例模式是最简单的设计模式之一,但是对于Java的开发者来说,它却有很多缺陷。在本月的专栏中,David Geary探讨了单例模式以及在面对多线程(multithreading)、类装载器(classloaders)和序列化(serialization)时如何处理这些缺陷。
单例模式适合于一个类只有一个实例的情况,比如窗口管理器,打印缓冲池和文件系统,它们都是原型的例子。典型的情况是,那些对象的类型被遍及一个软件系统的不同对象访问,因此需要一个全局的访问指针,这便是众所周知的单例模式的应用。当然这只有在你确信你不再需要任何多于一个的实例的情况下。
单例模式的用意在于前一段中所关心的。通过单例模式你可以:
确保一个类只有一个实例被建立
提供了一个对对象的全局访问指针
在不影响单例类的客户端的情况下允许将来有多个实例
尽管单例设计模式如在下面的图中的所显示的一样是最简单的设计模式,但对于粗心的Java开发者来说却呈现出许多缺陷。这篇文章讨论了单例模式并揭示了那些缺陷。
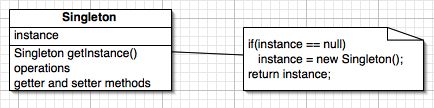
单例模式 在《设计模式》一书中,作者这样来叙述单例模式的:确保一个类只有一个实例并提供一个对它的全局访问指针。
正如你在上图中所看到的,这不是单例模式的完整部分。此图中单例类保持了一个对唯一的单例实例的静态引用,并且会从静态getInstance()方法中返回对那个实例的引用。
1
2
3
4
5
6
7
8
9
10
11
12
13
public class ClassicSingleton { private static ClassicSingleton instance = null ; protected ClassicSingleton () { } public static ClassicSingleton getInstance () { if (instance == null ) { instance = new ClassicSingleton (); } return instance; } }
在例1中的单例模式的实现很容易理解。ClassicSingleton类保持了一个对单独的单例实例的静态引用,并且从静态方法getInstance()中返回那个引用。
1
2
3
4
5
6
7
public class SingletonInstantiator { public SingletonInstantiator () { ClassicSingleton instance = ClassicSingleton.getInstance(); ClassicSingleton anotherInstance = new ClassicSingleton (); ... } }
前面这个代码片段为何能在没有继承ClassicSingleton并且ClassicSingleton类的构造方法是protected的情况下创建其实例?
关于ClassicSingleton的第三点感兴趣的地方是,如果单例由不同的类装载器装入,那便有可能存在多个单例类的实例。假定不是远端存取,例如一些servlet容器对每个servlet使用完全不同的类装载器,这样的话如果有两个servlet访问一个单例类,它们就都会有各自的实例。
正如你从前面的讨论中所看到的,尽管单例模式是最简单的设计模式之一,在Java中实现它也是决非想象的那么简单。这篇文章接下来会揭示Java规范对单例模式进行的考虑,但是首先让我们近水楼台的看看你如何才能测试你的单例类。
测试单例模式
接下来,我使用与log4j相对应的JUnit来测试单例类,它会贯穿在这篇文章余下的部分。如果你对JUnit或log4j不很熟悉,请参考相关资源。
例2是一个用JUnit测试例1的单例模式的案例:
1
2
3
4
5
6
7
8
9
10
11
12
13
14
15
16
17
18
19
20
21
22
23
24
25
import org.apache.log4j.Logger;import junit.framework.Assert;import junit.framework.TestCase;public class SingletonTest extends TestCase { private ClassicSingleton sone = null , stwo = null ; private static Logger logger = Logger.getRootLogger(); public SingletonTest (String name) { super (name); } public void setUp () { logger.info("getting singleton..." ); sone = ClassicSingleton.getInstance(); logger.info("...got singleton: " + sone); logger.info("getting singleton..." ); stwo = ClassicSingleton.getInstance(); logger.info("...got singleton: " + stwo); } public void testUnique () { logger.info("checking singletons for equality" ); Assert.assertEquals(true , sone == stwo); } }
例2两次调用ClassicSingleton.getInstance(),并且把返回的引用存储在成员变量中。方法testUnique()会检查这些引用看它们是否相同。例3是这个测试案例的输出:
init:
compile:
run-test-text:
正如前面的清单所示,例2的简单测试顺利通过—-通过ClassicSingleton.getInstance()获得的两个单例类的引用确实相同;然而,你要知道这些引用是在单线程中得到的。下面的部分着重于用多线程测试单例类。
多线程因素的考虑
在例1中的ClassicSingleton.getInstance()方法由于下面的代码而不是线程安全的:
1
2
3
if (instance == null ) { instance = new Singleton (); }
如果一个线程在第二行的赋值语句发生之前切换,那么成员变量instance仍然是null,然后另一个线程可能接下来进入到if块中。在这种情况下,两个不同的单例类实例就被创建。不幸的是这种假定很少发生,这样这种假定也很难在测试期间出现(译注:在这可能是作者对很少出现这种情况而导致无法测试从而使人们放松警惕而感到叹惜)。为了演示这个线程轮换,我得重新实现例1中的那个类。例4就是修订后的单例类:
1
2
3
4
5
6
7
8
9
10
11
12
13
14
15
16
17
18
19
20
21
22
23
24
25
26
27
28
29
30
31
32
33
import org.apache.log4j.Logger;public class Singleton { private static Singleton singleton = null ; private static Logger logger = Logger.getRootLogger(); private static boolean firstThread = true ; protected Singleton () { } public static Singleton getInstance () { if (singleton == null ) { simulateRandomActivity(); singleton = new Singleton (); } logger.info("created singleton: " + singleton); return singleton; } private static void simulateRandomActivity () { try { if (firstThread) { firstThread = false ; logger.info("sleeping..." ); Thread.currentThread().sleep(50 ); } } catch (InterruptedException ex) { logger.warn("Sleep interrupted" ); } } }
除了在这个清单中的单例类强制使用了一个多线程错误处理,例4类似于例1中的单例类。在getInstance()方法第一次被调用时,调用这个方法的线程会休眠50毫秒以便另外的线程也有时间调用getInstance()并创建一个新的单例类实例。当休眠的线程觉醒时,它也会创建一个新的单例类实例,这样我们就有两个单例类实例。尽管例4是人为如此的,但它却模拟了第一个线程调用了getInstance()并在没有完成时被切换的真实情形。
1
2
3
4
5
6
7
8
9
10
11
12
13
14
15
16
17
18
19
20
21
22
23
24
25
26
27
28
29
30
31
32
33
34
35
36
37
38
39
40
41
42
43
import org.apache.log4j.Logger;import junit.framework.Assert;import junit.framework.TestCase;public class SingletonTest extends TestCase { private static Logger logger = Logger.getRootLogger(); private static Singleton singleton = null ; public SingletonTest (String name) { super (name); } public void setUp () { singleton = null ; } public void testUnique () throws InterruptedException { Thread threadOne = new Thread (new SingletonTestRunnable ()), threadTwo = new Thread (new SingletonTestRunnable ()); threadOne.start(); threadTwo.start(); threadOne.join(); threadTwo.join(); } private static class SingletonTestRunnable implements Runnable { public void run () { Singleton s = Singleton.getInstance(); synchronized (SingletonTest.class) { if (singleton == null ) singleton = s; } Assert.assertEquals(true , s == singleton); } } }
例5的测试案例创建两个线程,然后各自启动,等待完成。这个案例保持了一个对单例类的静态引用,每个线程都会调用Singleton.getInstance()。如果这个静态成员变量没有被设置,那么第一个线程就会将它设为通过调用getInstance()而得到的引用,然后这个静态变量会与一个局部变量比较是否相等。
1
2
3
4
5
6
7
8
9
10
11
12
13
14
15
16
17
18
19
20
Buildfile: build.xml init: [echo] Build 20030414 (14-04-2003 03:06) compile: run-test-text: INFO Thread-1: sleeping... INFO Thread-2: created singleton: Singleton@7e5cbd INFO Thread-1: created singleton: Singleton@704ebb junit.framework.AssertionFailedError: expected: but was: at junit.framework.Assert.fail(Assert.java:47) at junit.framework.Assert.failNotEquals(Assert.java:282) at junit.framework.Assert.assertEquals(Assert.java:64) at junit.framework.Assert.assertEquals(Assert.java:149) at junit.framework.Assert.assertEquals(Assert.java:155) at SingletonTest$SingletonTestRunnable.run(Unknown Source) at java.lang.Thread.run(Thread.java:554) [java] . [java] Time: 0.577 [java] OK (1 test)
到现在为止我们已经知道例4不是线程安全的,那就让我们看看如何修正它。
同步
要使例4的单例类为线程安全的很容易—-只要像下面一个同步化getInstance()方法:
1
2
3
4
5
6
7
8
public synchronized static Singleton getInstance () { if (singleton == null ) { simulateRandomActivity(); singleton = new Singleton (); } logger.info("created singleton: " + singleton); return singleton; }
在同步化getInstance()方法后,我们就可以得到例5的测试案例返回的下面的结果:
1
2
3
4
5
6
7
8
9
10
11
12
13
14
15
16
Buildfile: build.xml init: [echo] Build 20030414 (14-04-2003 03:15) compile: [javac] Compiling 2 source files run-test-text: INFO Thread-1: sleeping... INFO Thread-1: created singleton: Singleton@ef577d INFO Thread-2: created singleton: Singleton@ef577d [java] . [java] Time: 0.513 [java] OK (1 test)
这此,这个测试案例工作正常,并且多线程的烦恼也被解决;然而,机敏的读者可能会认识到getInstance()方法只需要在第一次被调用时同步。因为同步的性能开销很昂贵(同步方法比非同步方法能降低到100次左右),或许我们可以引入一种性能改进方法,它只同步单例类的getInstance()方法中的赋值语句。
一种性能改进的方法
寻找一种性能改进方法时,你可能会选择像下面这样重写getInstance()方法:
1
2
3
4
5
6
7
8
public static Singleton getInstance () { if (singleton == null ) { synchronized (Singleton.class) { singleton = new Singleton (); } } return singleton;}
这个代码片段只同步了关键的代码,而不是同步整个方法。然而这段代码却不是线程安全的。考虑一下下面的假定:线程1进入同步块,并且在它给singleton成员变量赋值之前线程1被切换。接着另一个线程进入if块。第二个线程将等待直到第一个线程完成,并且仍然会得到两个不同的单例类实例。有修复这个问题的方法吗?请读下去。
双重加锁检查
初看上去,双重加锁检查似乎是一种使懒汉式实例化为线程安全的技术。下面的代码片段展示了这种技术:
1
2
3
4
5
6
7
8
9
10
public static Singleton getInstance () { if (singleton == null ) { synchronized (Singleton.class) { if (singleton == null ) { singleton = new Singleton (); } } } return singleton; }
如果两个线程同时访问getInstance()方法会发生什么?想像一下线程1进行同步块马上又被切换。接着,第二个线程进入if 块。当线程1退出同步块时,线程2会重新检查看是否singleton实例仍然为null。因为线程1设置了singleton成员变量,所以线程2的第二次检查会失败,第二个单例类实例也就不会被创建。似乎就是如此。
一个改进的线程安全的单例模式实现
例7列出了一个简单、快速而又是线程安全的单例模式实现:
1
2
3
4
5
6
public class Singleton { public final static Singleton INSTANCE = new Singleton (); private Singleton () { } }
这段代码是线程安全的是因为静态成员变量一定会在类被第一次访问时被创建。你得到了一个自动使用了懒汉式实例化的线程安全的实现;你应该这样使用它:
1
2
3
4
Singleton singleton = Singleton.INSTANCE;singleton.dothis(); singleton.dothat(); ...
当然万事并不完美,前面的Singleton只是一个折衷的方案;如果你使用那个实现,你就无法改变它以便后来你可能想要允许多个单例类的实例。用一种更折哀的单例模式实现(通过一个getInstance()方法获得实例)你可以改变这个方法以便返回一个唯一的实例或者是数百个实例中的一个.你不能用一个公开且是静态的(public static)成员变量这样做.
你可以安全的使用例7的单例模式实现或者是例1的带一个同步的getInstance()方法的实现.然而,我们必须要研究另一个问题:你必须在编译期指定这个单例类,这样就不是很灵活.一个单例类的注册表会让我们在运行期指定一个单例类.
使用注册表
在运行期指定单例类
防止产生多个单例类子类的实例
1
2
3
4
5
6
7
8
9
10
11
12
13
14
15
16
17
18
19
20
21
22
23
24
25
26
27
28
29
import java.util.HashMap;import org.apache.log4j.Logger;public class Singleton { private static HashMap map = new HashMap (); private static Logger logger = Logger.getRootLogger(); protected Singleton () { } public static synchronized Singleton getInstance (String classname) { if (classname == null ) throw new IllegalArgumentException ("Illegal classname" ); Singleton singleton = (Singleton)map.get(classname); if (singleton != null ) { logger.info("got singleton from map: " + singleton); return singleton; } if (classname.equals("SingeltonSubclass_One" )) singleton = new SingletonSubclass_One (); else if (classname.equals("SingeltonSubclass_Two" )) singleton = new SingletonSubclass_Two (); map.put(classname, singleton); logger.info("created singleton: " + singleton); return singleton; } }
这段代码的基类首先创建出子类的实例,然后把它们存储在一个Map中。但是基类却得付出很高的代价因为你必须为每一个子类替换它的getInstance()方法。幸运的是我们可以使用反射处理这个问题。
使用反射
在例9的带注册表的单例类中,使用反射来实例化一个特殊的类的对象。与例8相对的是通过这种实现,Singleton.getInstance()方法不需要在每个被实现的子类中重写了。
1
2
3
4
5
6
7
8
9
10
11
12
13
14
15
16
17
18
19
20
21
22
23
24
25
26
27
28
29
30
31
32
33
34
35
import java.util.HashMap;import org.apache.log4j.Logger;public class Singleton { private static HashMap map = new HashMap (); private static Logger logger = Logger.getRootLogger(); protected Singleton () { } public static synchronized Singleton getInstance (String classname) { Singleton singleton = (Singleton)map.get(classname); if (singleton != null ) { logger.info("got singleton from map: " + singleton); return singleton; } try { singleton = (Singleton)Class.forName(classname).newInstance(); } catch (ClassNotFoundException cnf) { logger.fatal("Couldn't find class " + classname); } catch (InstantiationException ie) { logger.fatal("Couldn't instantiate an object of type " + classname); } catch (IllegalAccessException ia) { logger.fatal("Couldn't access class " + classname); } map.put(classname, singleton); logger.info("created singleton: " + singleton); return singleton; } }
关于单例类的注册表应该说明的是:它们应该被封装在它们自己的类中以便最大限度的进行复用。
封装注册表
例10列出了一个单例注册表类。
1
2
3
4
5
6
7
8
9
10
11
12
13
14
15
16
17
18
19
20
21
22
23
24
25
26
27
28
29
30
31
32
33
34
35
36
import java.util.HashMap;import org.apache.log4j.Logger;public class SingletonRegistry { public static SingletonRegistry REGISTRY = new SingletonRegistry (); private static HashMap map = new HashMap (); private static Logger logger = Logger.getRootLogger(); protected SingletonRegistry () { } public static synchronized Object getInstance (String classname) { Object singleton = map.get(classname); if (singleton != null ) { return singleton; } try { singleton = Class.forName(classname).newInstance(); logger.info("created singleton: " + singleton); } catch (ClassNotFoundException cnf) { logger.fatal("Couldn't find class " + classname); } catch (InstantiationException ie) { logger.fatal("Couldn't instantiate an object of type " + classname); } catch (IllegalAccessException ia) { logger.fatal("Couldn't access class " + classname); } map.put(classname, singleton); return singleton; } }
注意我是把SingletonRegistry类作为一个单例模式实现的。我也通用化了这个注册表以便它能存储和取回任何类型的对象。例11显示了的Singleton类使用了这个注册表。
1
2
3
4
5
6
7
8
9
10
11
12
import java.util.HashMap;import org.apache.log4j.Logger;public class Singleton { protected Singleton () { } public static Singleton getInstance () { return (Singleton)SingletonRegistry.REGISTRY.getInstance(classname); } }
上面的Singleton类使用那个注册表的唯一实例通过类名取得单例对象。
Classloaders
在许多情况下,使用多个类载入器是很普通的–包括servlet容器–所以不管你在实现你的单例类时是多么小心你都最终可以得到多个单例类的实例。如果你想要确保你的单例类只被同一个的类载入器装入,那你就必须自己指定这个类载入器;例如:
1
2
3
4
5
6
7
8
9
10
private static Class getClass (String classname) throws ClassNotFoundException { ClassLoader classLoader = Thread.currentThread().getContextClassLoader(); if (classLoader == null ) classLoader = Singleton.class.getClassLoader(); return (classLoader.loadClass(classname)); } }
这个方法会尝试把当前的线程与那个类载入器相关联;如果classloader为null,这个方法会使用与装入单例类基类的那个类载入器。这个方法可以用Class.forName()代替。
序列化
如果你序列化一个单例类,然后两次重构它,那么你就会得到那个单例类的两个实例,除非你实现readResolve()方法,像下面这样:
1
2
3
4
5
6
7
8
9
10
11
12
import org.apache.log4j.Logger;public class Singleton implements java .io.Serializable { public static Singleton INSTANCE = new Singleton (); protected Singleton () { } private Object readResolve () { return INSTANCE; } }
上面的单例类实现从readResolve()方法中返回一个唯一的实例;这样无论Singleton类何时被重构,它都只会返回那个相同的单例类实例。
1
2
3
4
5
6
7
8
9
10
11
12
13
14
15
16
17
18
19
20
21
22
23
24
25
26
27
28
29
30
31
32
33
34
35
36
37
38
39
40
41
42
43
44
45
46
47
48
49
50
51
52
53
54
55
56
57
58
59
60
61
62
63
64
65
import java.io.*;import org.apache.log4j.Logger;import junit.framework.Assert;import junit.framework.TestCase;public class SingletonTest extends TestCase { private Singleton sone = null , stwo = null ; private static Logger logger = Logger.getRootLogger(); public SingletonTest (String name) { super (name); } public void setUp () { sone = Singleton.INSTANCE; stwo = Singleton.INSTANCE; } public void testSerialize () { logger.info("testing singleton serialization..." ); [b] writeSingleton(); Singleton s1 = readSingleton(); Singleton s2 = readSingleton(); Assert.assertEquals(true , s1 == s2);[/b] } private void writeSingleton () { try { FileOutputStream fos = new FileOutputStream ("serializedSingleton" ); ObjectOutputStream oos = new ObjectOutputStream (fos); Singleton s = Singleton.INSTANCE; oos.writeObject(Singleton.INSTANCE); oos.flush(); } catch (NotSerializableException se) { logger.fatal("Not Serializable Exception: " + se.getMessage()); } catch (IOException iox) { logger.fatal("IO Exception: " + iox.getMessage()); } } private Singleton readSingleton () { Singleton s = null ; try { FileInputStream fis = new FileInputStream ("serializedSingleton" ); ObjectInputStream ois = new ObjectInputStream (fis); s = (Singleton)ois.readObject(); } catch (ClassNotFoundException cnf) { logger.fatal("Class Not Found Exception: " + cnf.getMessage()); } catch (NotSerializableException se) { logger.fatal("Not Serializable Exception: " + se.getMessage()); } catch (IOException iox) { logger.fatal("IO Exception: " + iox.getMessage()); } return s; } public void testUnique () { logger.info("testing singleton uniqueness..." ); Singleton another = new Singleton (); logger.info("checking singletons for equality" ); Assert.assertEquals(true , sone == stwo); } }
前面这个测试案例序列化例12中的单例类,并且两次重构它。然后这个测试案例检查看是否被重构的单例类实例是同一个对象。下面是测试案例的输出:
1
2
3
4
5
6
7
8
9
10
11
12
13
14
15
Buildfile: build.xml init: [echo] Build 20030422 (22-04-2003 11:32) compile: run-test-text: [java] .INFO main: testing singleton serialization... [java] .INFO main: testing singleton uniqueness... [java] INFO main: checking singletons for equality [java] Time: 0.1 [java] OK (2 tests)
单例模式结束语
单例模式简单却容易让人迷惑,特别是对于Java的开发者来说。在这篇文章中,作者演示了Java开发者在顾及多线程、类载入器和序列化情况如何实现单例模式。作者也展示了你怎样才能实现一个单例类的注册表,以便能够在运行期指定单例类。
原文:http://calmness.iteye.com/blog/60179